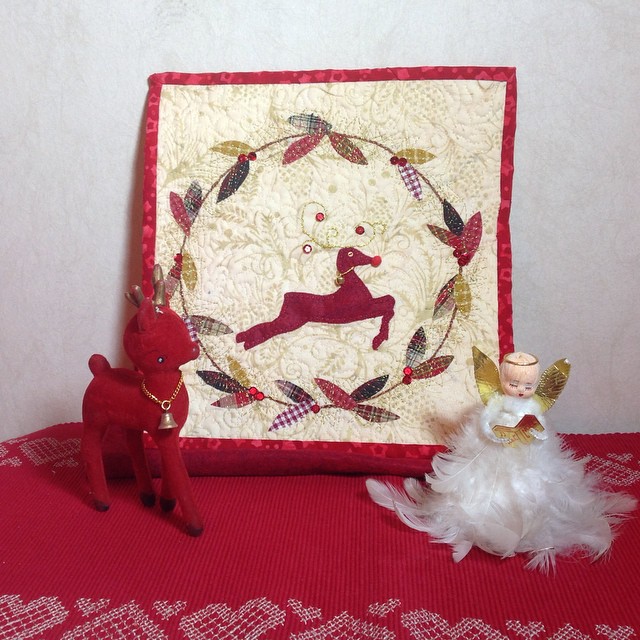
Stitching Christmas Wishes
/Christmas this year is going to be really special. It is the first christmas in our new home and in England for some time and all our three wanderers will be back with us. It will be the first time since last christmas in Sweden that we have all been together. It is true 'there is no place like home' and I love the familiarity of all the christmas traditions I hold so dear and the ease with which I can put this all together this year. All those delicious ingredients to make Christmas Mincemeat and Puddings are already heaped on the supermarket shelves along with crackers and all the other things that are needed to make this an 'english' annual ritual. That is not to say that we will forget all the lovely things we have picked up along the way in our many years of travel. Incorporated into the festivites will be a French Christmas Eve Feast, a Russian New Year Celebration and a Swedish Smorgasbord. We have deocrations from all our travels, and a few small traditions that we have incorporated into our family celebrations. I'll be writing more about all of this as December goes along.
For now though, it is time to get busy in the sewing room to make a few small gifts and decorations, which I try to do every year. This year I wanted to make some small applique pictures - almost like fabric chrismas cards that I could send easily to friends and family in the post. I chose one of my favourite winter motifs - the reindeer as the central idea. In Stockholm, our garden was a winter wonderland by this time of year and the local deer would wander about, in and out of the trees and the snow and fill the air with the spirit of christmas. I shall miss that this year, but in truth what prompted it all was a little red velveteen reindeer, found in an old ice cream carton amongst all the stuff we got out of storage with the move home. I haven't seen him in many many years, but he belongs firmly in the christmases of my childhood. As a tiny girl, I would play with him underneath the christmas tree and I remember being most upset that he had to go back in his box when christmas was over.
So I gathered together all my christmas fabrics and trimmings and felt and velvet and started messing about.
I searched on google images for a silhouette shape that would work with applique - there were plenty to chose from and I printed it off and adjusted the size on the photo copier to make it alittle larger. Trace the outline onto fusible web, remembering that it will be in reverse. I actually traced my reindeer both ways so I could have him facing either way.
For my background fabric I chose christmas batik prints - I especially like this one as the reindeer looks quite at home prancing amongst the trees. I used a tea plate to draw a circle with a white chalk pencil and then I embroidered the outline with a perle cotton 8 tweedy thread and a chain or tambour stitch.
Next iron on your reindeer using the fusible web to fix it. I used both felt and velvet and both worked easily. Felt is probably slightly easier to work with because it doesn't fray around the edges like cotton velvet. Anyhow, once your little guy is in place (make sure you leave space for the embroidered antlers), you need to secure him with a blanket stitch on the machine or by hand.
Next draw on your antlers and set to work to embroider them however you like. I chose to use some gold and silver thread that was couched using a fine metallic thread. Couching simply means that you lay the thicker thread on the outline you want and stitch it down with tiny overstitches.
To add a little extra sparkle, I put a few sequins on the ends of the curling horns, a tiny bell around his neck and a fluffy red nose. I felt he needed to be able to see his beautiful surroundings, so I used one of those tiny micro buttons for an eye. I think he is looking pretty neat now.
For the wreath around the edge, I used up lots of scraps of tartan and plaid flannel fabrics, backed with fusible web and simply cut out in tiny leaf shapes. Scattering them around the ring looked rather pretty.
I ironed them on and then decided that there was no way I was going to stitch around each one to secure it, so I had another idea. I layered it with the batting and backing.
Then I put the fine metallic thread in my sewing machine. I am not a great fan of sewing with this - it is a bit faffy and the thread can break frequently. It is absolutely essential to have the right needle in your machine. I stitched a twiggy zig-zaggy higgledy-piggledy wreath all over the leaves and actually it worked really well.
Finally add some berries - either more sequins or buttons or you can add some tiny felt ones and glue them on before stitching the wreath as I did on the first one I made.
Bind it up and VOILA - I think it's a charming christmas card and one that will last more many more christmases to come!
Off now to make some Cranberry, Clementine and Pecan Mincemeat. See you soon, Ruby x


