Venice!!!!

Venice!!!!

I feel like I have no words to describe how utterly bewitching Venice is and how it's beauty completely caught me off guard.   I simply had no idea.  I mean I did... but no....I didn't really.  You see pictures of it and you see it in films, but nothing can prepare you for the breath taking panoramas that greet with every turn in every canal.   It is a sparkling city - a place for dreaming and letting your mind melt into the scene you behold.   I think Jan Morris' description says it all "It is very old, and very grand, and bent-backed.  Its towers survey the lagoon in crotchety splendour, some leaning one, some another.  Its skyline is elaborate with campaniles, domes, pinnacles and a big red grain elevator.  There are glimpses of flags and fretted rooftops, marble pillars, cavernous canals.  An incessant bustle of boats passes before the quays of the place; a great white liner slips towards its port; a multitude of tottering palaces, brooding and monstrous, presses towards its water front like so many invalid aristocrats jostling for fresh air.  It is a gnarled but gorgeous city: and as the boat approaches through the last church-crowned islands......so the whole scene seems to shimmer - with pinkness, with age, with self-satisfaction, with sadness, with delight.  The navigator stows away his charts and puts on a gay straw hat; for he has reached that paragon among landfalls, Venice." (exact from 'Venice' by Jan Morris 1963).

Read More

Making embroidery Modern!

This is one of my mantras - I confess.  I know I have said it before, but I am always on a mission to 'Make Embroidery Modern'.  It is such a beautiful and creative medium to express yourself and what's more, its useful too.  This week an impromptu project came along that whipped itself up into a day of non-stop stitching.   The result .... well, I was pretty excited about it.

A few days before hand, I had been to visit Cliffe Castle Museum in Keighly.  This is a charming small museum set in a house that was once owned by the family Butterfield.  In the 19th Century, vast fortunes were made in the north of England with the Industrial Revolution making it the heart of textile production in the World.  The Butterfields were an example of a family that were at the centre of this.  As with all great family fortunes... the first generation is the exceptional one, taking the risk and developing the business.  The second generation exploit and enjoy it and the third generation usually squander it and the fortune having been spread around so many descendants is thin on the ground and finally fizzles out.  So it was here, but in the gilded age, Cliffe Castle was a magnificent residence that supported an opulent and dazzling lifestyle. 

Cliffe Castle.JPG

Henry Issac Butterfield was second generation son, who made Cliffe Castle a magnificent place.  Splitting his year between America (there were Roosevelt connections in the family through marriage) and Paris and Yorkshire, he bought expensive furniture and furnishings on his travels and shipped them home to create a mansion in true high victorian style.  

Overloaded with gilt and heavily carved and embossed items, the rooms are chokingly opulent.  Magnificent chandeliers and fireplaces are the centre pieces of rooms in which every surface is covered with pattern.

Cliffe Castle room.JPG

There is a small but lovely collection of costumes on display and as I always find, I am drawn to those beautiful embroideries on silk that embellished the bodices and waistcoats of the late 18th and early 19th century.

Dress Cliffe Castle.JPG

Things were so much prettier in those days (if you were rich of course) and I love how the women were so feminine.  I looked at my jeans in despair!!!  That evening, I came home and browsed through my small collection of historical costume books, which frankly make much better reading than the fashion magazines of today.  Then something else happened. 

 We booked a last minute trip to Venice for a few days to celebrate our wedding anniversary.  Like all of us girls are prone to do....I flew into a panic...at not having anything nice to wear.  It is quite a while since we took a trip like this to a warm and sunny and exotic place and my wardrobe was sadly rather more geared up to windy and chilly Yorkshire days.  I dashed into our local town where we have a delightfully old fashioned department store called Harveys.  They have a fabulous selection of lovely and unusual clothes that aren't geared up for 20 year old stick insects and you even get wonderful customer service.  I picked up a few items and amongst them was this white linen tunic made by Phase Eight - which is actually easily available everywhere and not expensive.   I love White fabrics and although I sometimes get a bit cross with all the creasing that goes on with linen, I found the style of this top so appealing and comfortable that I bought it and knew the second I put it on, what it needed.   EMBROIDERY!

I began a little cautiously.  A few lazy daisy flowers in 12 weight cotton thread.  A couple of leaves followed and dispelled all inhibitions - I sewed and sewed all afternoon and into the dusk.  All the stitches used are basic embroidery stitches, most of them self taught from a book or Youtube.

Venice top2.JPG

 Colonial knots (much better than french knots bye the way), Button hole stitch, Split Stitch and a simple Back Stitch were the basis for the design.   Drawing a rough outline with a fabric maker pencil helps to position your flowers, but otherwise just let your imagination run away with you. The great thing about doing something like this is that you can be as whimsical or as real as you like.  I mean 'a turquoise dandelion' - how lovely is that to wear around your neck?

IMG_1301.JPG

I chose fresh and cheerful colours and I think the result is a sort of modern version of the all those 18th century costumes I love so much.  In fact, we are the lucky ones really... we don't have to wear all those 'take your breath away' corsets and strangling collars and frills and flounces.  We can simply take the best of it and translate it onto our own more modern, washable, breathable items of clothing.  

This little project has brought me so much joy and I can't wait to wear it, hopefully languishing on a gondola!!!!!

embroideredtop.JPG

Next time, Alice in Wonderland....I promise. Love Ruby x

Steamer Trunks, Edgar and a Flag!

Hi everyone,

Cases.JPG

Lots to share with you today on the blog and I know I haven't written in a while, but I have been trying to finish off my final submissions for my 'on-line' embroidery and textiles course and it has been the most enormous amount of work.  I hope to be sharing more about this whole experience soon, but for now I am just sitting with my fingers crossed!!!!  Well sort of.... I have been sewing a little too.

First up - the Steamer Trunks Quilt is finished and its my favourite-est ever quilt!  It is just so pretty and cheerful and fills the room with dreams of travelling to far away lands in bygone times.   It was super fun to make all the labels and extra appliqués that make it special.

IMG_1278.JPG
IMG_1275.JPG
IMG_1276.JPG

When it came to backing the quilt, I had a problem, because the fabric that I had originally bought, somehow didn't really sit well with the finished quilt.  I hunted through my stash and found the same fabric in a lighter colour way which worked perfectly, but I didn't have enough of it for the whole backing.  What to do.... solution.... a bit more patchwork.  I added two side panels of a gorgeous Kaffe Fassett spotted fabric on either side and it worked perfectly.  

IMG_1258.JPG
Steamer Trunk Quilt.JPG

I thought about the quilting alot, but am not entirely sure I made the right choice.  My daughter suggested a paisley design and this was the right choice, but I am not sure that I shouldn't have done something different on the trunks themselves.  I think that the problem was I thought the design of the quilt was so beautiful on its own, that I didn't want the quilting to distract from the picture.  On reflection, it may have enhanced it.  My other quandary was what colour thread to choose as I had the light newspaper prints and then the heavy bold colours of the trunks.  I used a fine 50 weight Aurafil ivory coloured thread, but it was not a brilliant solution against the trunks.   Perhaps a grey shade would have been better.  

On the whole though, it all comes out in the mix OK and the quilt is just lovely.   Our sitting room is starting to take shape now and the new addition will be perfect on our new sofas, if they EVER arrive!  

Now to introduce you to Edgar Owl.

IMG_1284.JPG

In between everything else, I couldn't resist having a go at making up this Heather Bailey pattern that just charmed the socks off me.  You can find the pattern on her lovely website, along with delicious fabrics and heaps of inspiration.   It was so fun to do and a quick little project.   I have never really made stuffed animals before and he probably could have done with a little more stuffing in his tummy, but I think he might need a little girlie companion to keep him in line, so perhaps she will be a little rounder, shall we say (figures.. huh?!?!?!).  'Edgar' though,  is just the handsomest dude and sits beside my sewing machine now, inspecting everything I do.   He is supposed to be a pin cushion.... but honestly, I can't bring myself to stick a pin in him - he is much to serious for such a frivolous occupation.  Chief consultant on stitching decisions, seems way more appropriate although, in truth, he has as much to say about it as the rest of the boys in the house...LOL!

Finally, there has been some nice programmes on the TV recently to mark the anniversary of the Victory day celebrations after the second world war and an especially charming one about the Queen, then Princess Elizabeth, sneaking out of the Palace to join in with the crowds in the Streets of London. This prompted me to think about making a Union Jack quilt for the garden and I made a start on this new project.  The pattern I have is called Jumping Jacks from Joanna Figuero of Fig Tree Quilts.   I love her vintage style and it seems perfect for a project that has its roots in the 1940's.  The creams and tiny prints of her fabrics make you think of WI cake stalls, bunting and Land Girls. 

The first block is done and I am thrilled with it.  It is not the easiest block to make though because of the angles of the stripes and this takes a bit of getting to grips with.  I have it sussed now though, so the next blocks should be much quicker.   I'll be writing some tips about this as I go along in the next few weeks, so if you are interested check back, because making those points work is not as easy as it might look.

IMG_1274.JPG

I hope the Bank Holiday weekend brings you all lots of sunshine and time for pondering all the wonderful sewing projects that are out there.   A little Alice in Wonderland coming up next time.  Meanwhile, Happy Stitching.... Love Ruby x

Taking a Right Turn!

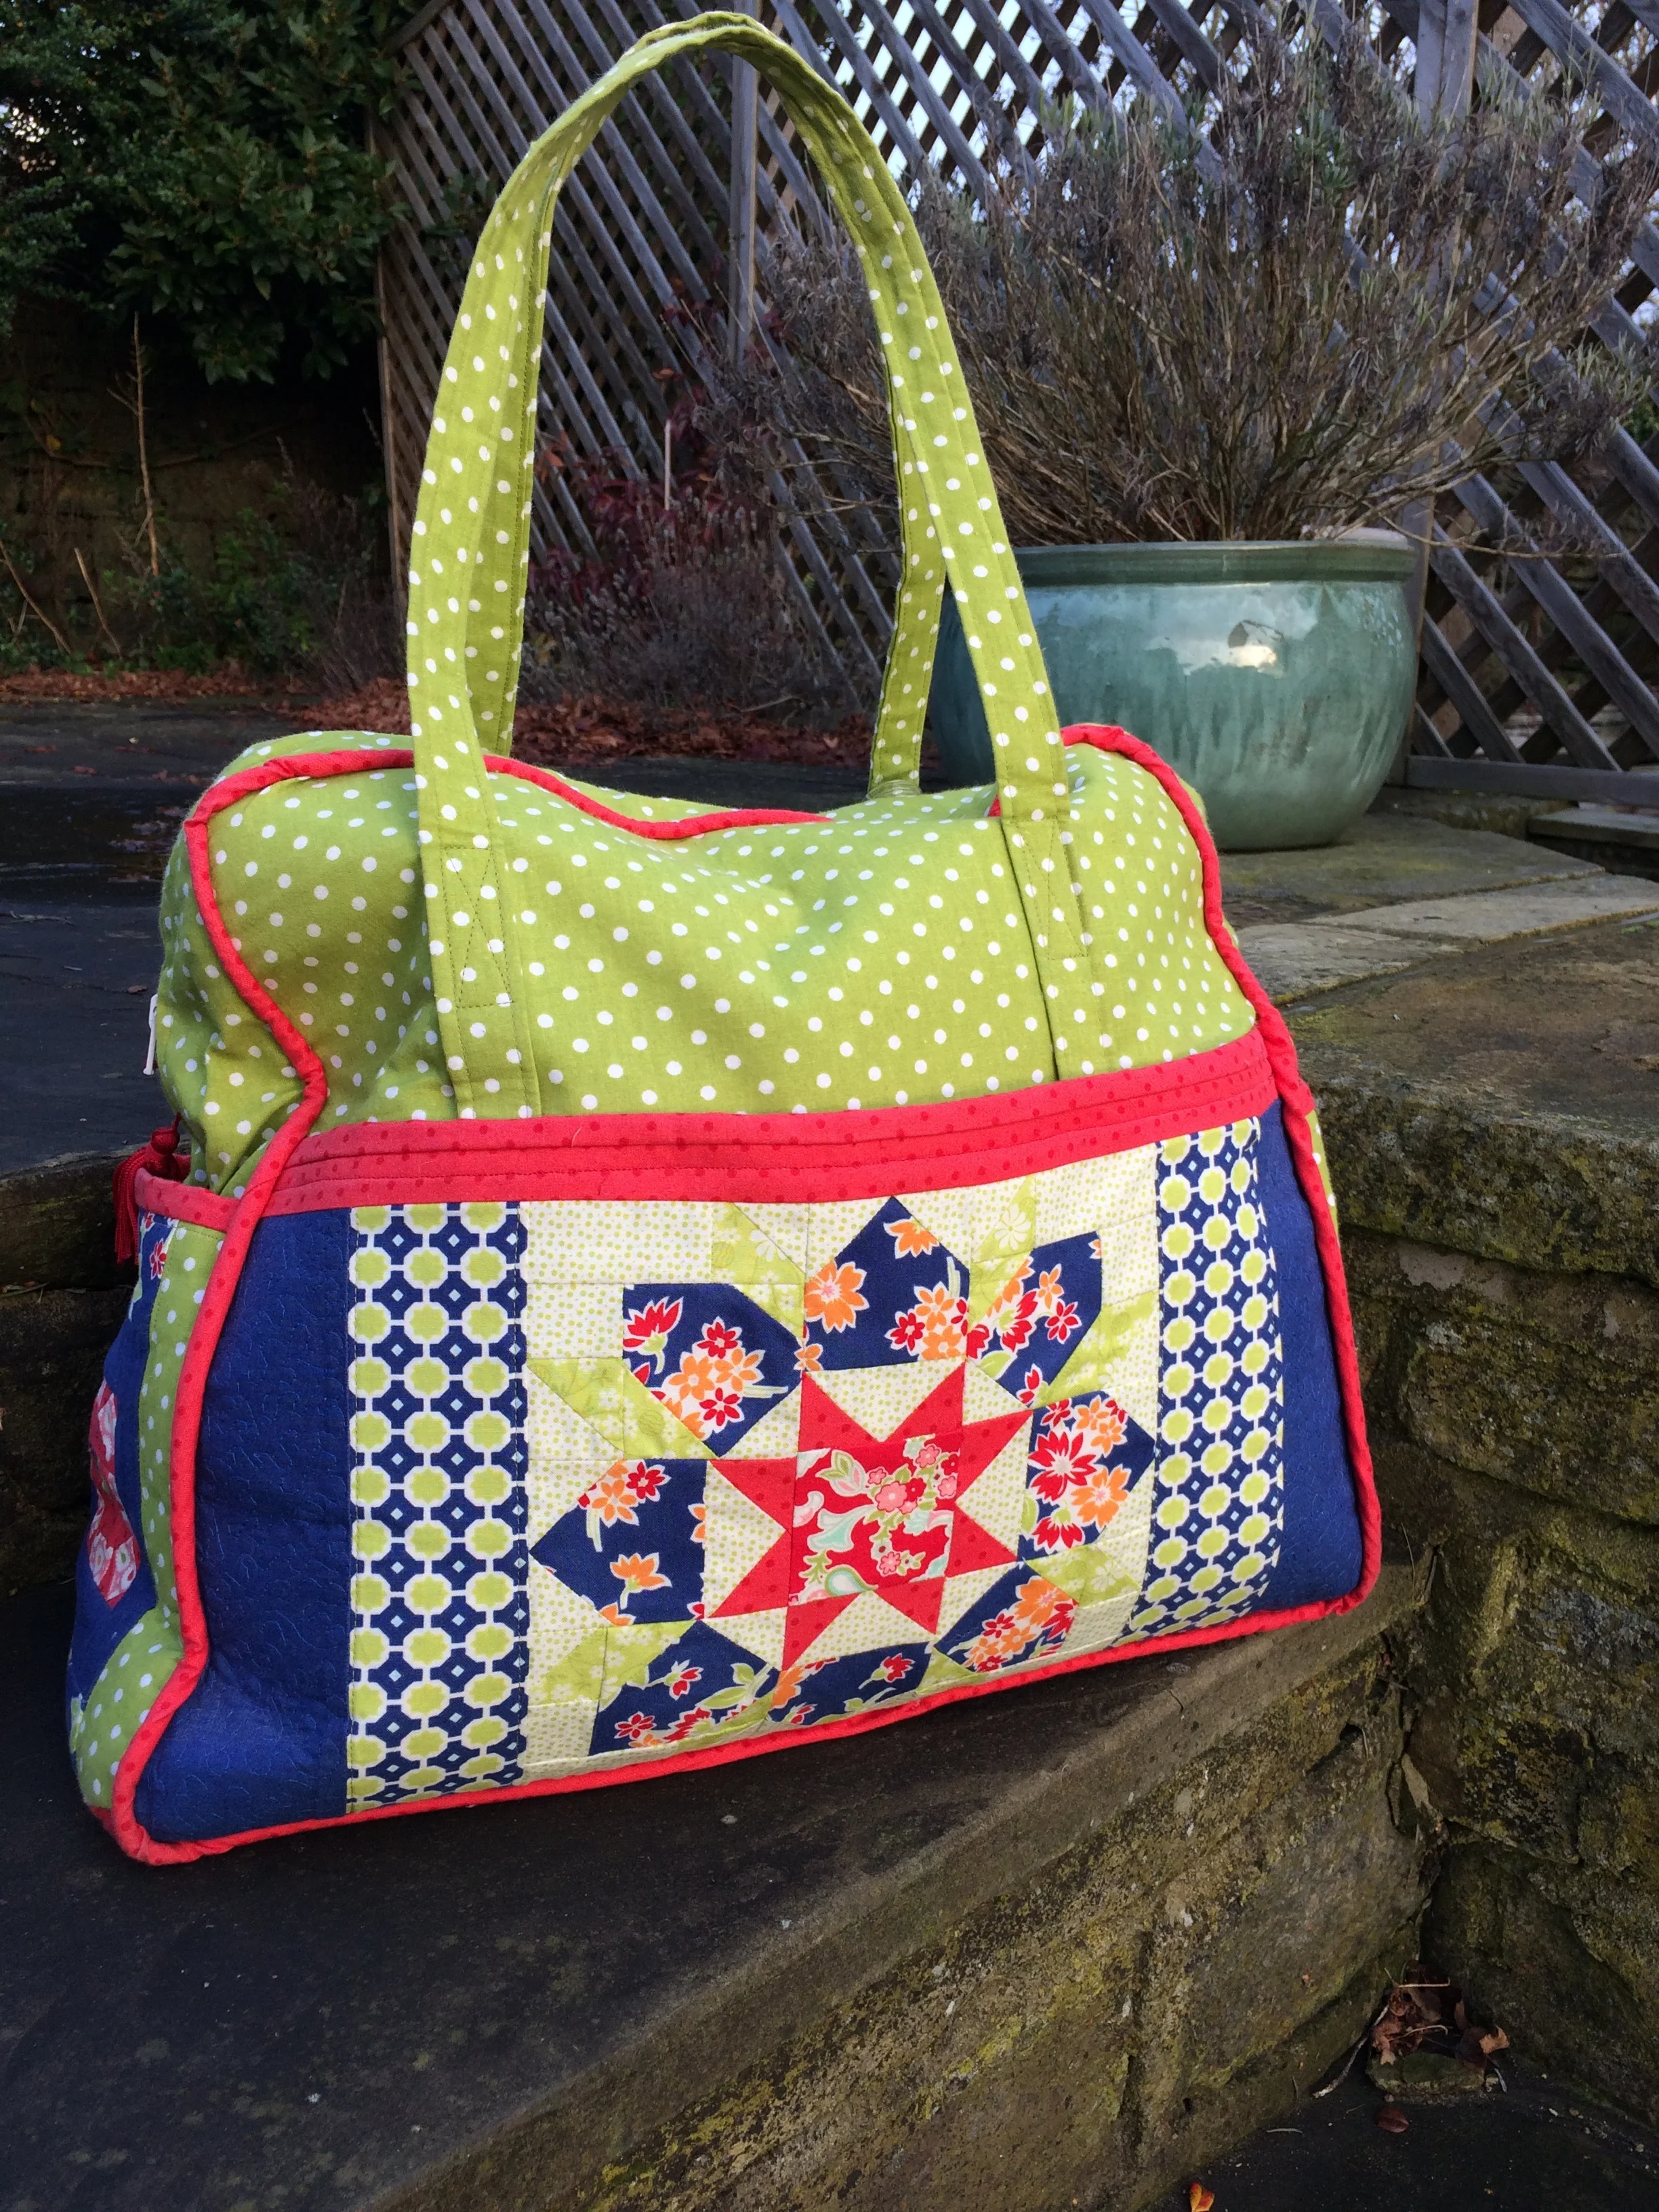
Well, it's nearly the weekend and I just wanted to pop up this little post in time for bank holiday.  I wish it was a little warmer and sunnier, but still, it is May and summer must be on its way.   Talking of summer, this week, I have been working on a little project that has been on my 'to do' list for over a year and as we are thinking of arranging a short holiday in June, it was finally time to get on with it.   It's a summer bag and I love it so much that I feel as if I am on my way on hols already. 

The bag is called 'The Right Turn Bag' by Anna Maria Horner for Janome and you can find the free pattern and instructions here:  

Anna Maria demonstrates every step of the way in the video tutorial, so I am not going to say much more except TA DA.......!

IMG_1197.JPG

If you want a fun weekend project and have lots of scraps to spare, then have a go and you can experiment with some of the decorative stitching (which you never really know what to do with....LOL) on your sewing machine.   The bag is light and roomy and  perfect for holidays and easily fits in your suitcase too.

Otherwise I am just about to embark on quilting my steamer trunk quilt.  It is layered up and ready to go....

steamert.png

So I wish you all a Happy May day weekend from Yorkshire.  Love Ruby x

IMG_0332.JPG

'Dwell'

Dwell3.jpg

Hope you all enjoyed the glorious, and somewhat unexpected, sunshine over the Easter holidays.  For us, the  long weekend was full of family and food and the garden.  I finally got started on a vegetable patch, which a totally new concept to me and quite exciting too.  The ground work is all done - the space was there and even a few fruit plants were there too, but it was overgrown and neglected after two summers of changing hands.  I have absolutely no idea what I am doing really, but the idea of being able to stroll over to the patch and pick something fresh for supper seems simply divine.   I have a book, I have some packets of seeds, so we shall see if I actually manage to grow anything at all.  I'll post some photos soon.

Dwell2.jpg

I haven't had nearly as much time for sewing as I would like, but one project is finished and just in the nick of time too.  For ages I have been wanting to make a baby quilt....or rather this specific baby quilt.....it was just that we are at that age where there are not many baby's around, if you know what I mean.  Anyhow, the chance came along, and I decided to have a go.   This pattern, called 'Dwell' is from my favourite book 'Simply Retro' by Camille Roskelley.  I have made quite a lot of the quilts in this book now, and I do love the fresh modern approach of her design.  I used her fabrics too and jumbled up the colours and it was a quick quilt to assemble.   It would be an ideal project for a beginner as it is not too big either.

It was really fun mixing and matching the fabrics to construct the little houses.

The quilting was fun too, allowing for a touch of whimsicality!  I think it is just charming and it will be on its way to a little girl who was born on Thursday.  I hope it is loved and snuggled in and played on and brings cheerfulness every day.   For my part, there is something magical in creating a gift for a whole new life.... a new little person and a whole new beginning.

Next time: The Steamer Trunk Quilt Part 2 - it's turning out to be really cool project, so hope you'll pop back and check it out.  Bye for now... Ruby x


The Steamer Trunk Quilt

IMG_1098.JPG

Where does the time go?.... I was planning to write up this piece on the blog last week and here we are...it's the beginning of another week already!!!!  I have been working on a few things... a baby quilt (more about that soon)..... Putting borders on Will's quilt too...(more about that soon too) but, events outside the sewing room have taken over the last week or so.   A spot of decorating has been going on here and finally, I am so happy to have got our sitting room sorted out.  We moved into our house in June last year and although most of the house didn't really need decorating, the main Sitting Room, certainly did.  I had planned to have it all done by Christmas, but some water leekage problems caused delays and with hindsight, this was maybe not a bad thing.  We have weathered a Yorkshire winter in the house and seen the room in different lights and had more than enough time to decide what to do.  I am so excited by the results that I just had to make a quilt to go in there.   It is a lovely big room, with a beautiful wooden floor and a large stone fireplace.  It needed brightening up and I think I have certainly done that.  I had a vision of what I was trying to achieve, taken from a tiny cutting out of a magazine and the memory of a couple of houses that I have glimpsed over many years of moving around, one of them from over 20 years ago, but still indelibly etched on my mind.   Do you ever do that? Carry an image around with you that you know one day will suddenly be what you are looking for?  Anyway, we have gone from this - to this.  We are still waiting for the new sofas to be delivered, but I just love it's cheerful feel.  Yellow makes a room sunny all year around!

My Kaffe Fassett diamonds quilt will live in here... but, let's be realistic..... one quilt is simply not enough.  This time though it was a new idea, not an old one that sent me into a heady spin in the sewing room.   Perhaps it was the fact that our room has treasures from our travels....pictures from our travels are at the framers too.... or perhaps it was just that I picked up this pattern at the last quilt shop stop in Houston, before I left for the airport last month, because I am a sucker for anything to do with Steamer Trunks and that glamourous image of travelling in days gone by.  

The pattern is called 'Bon Voyage' by Coach House designs and in the cover picture, it is a collection of pretty pastel trunks, stacked on top of one another, as if waiting to be loaded up aboard a steamer bound for Suez or the midnight train to St. Petersburg.

Being more of a strong colour girl myself, I started rummaging in my stash for prints that reminded me of old Steamer Trunks.  It was easy.... the blocks started coming together rapidly - it is a fast and easy project.  A little bit of Anna Maria Horner fabric, a touch of Amy Butler and a dash of Kaffe Fassett and suddenly you have an explosion of colour.

Using these bold prints also allows some fussy cutting to use the design.  For example, I think this lovely circular motif will make a fab lock for one of the trunks.  

I used a new idea that I had recently seen on the internet to do this.  First of all cut out the motif with plenty of fabric to spare around the edge.  Lay it, face down on to similar size piece of muslin or any other old piece of fabric.  Stitch all the way around the edges, using your motif as your stitch line guide.

Then once it is turned out, give it a good press to be sure it is nice and flat.

I altered some of the fastening details - there is an assortment of templates for the locks and straps and you can fussy cut some fabrics to create the desired effect.  The appliqué bits and bobs are done using the freezer paper technique and I like to do this. 

I machined the pieces down though, rather than hand sewing them, partly because this is just going to be a fun quilt that will laze on our Chesterfield.

It was just a days work to get to this point.... and is a great project for a beginner.   I love how it looks and how the jumble of patterns and colours go together.  I still have alot of stitch detail to work, but I think that my Janome is going to help with this.   My luggage seems pretty exotic to me.... definitely headed to far away lands.   Now that I basically have my stack, I have to think about the accompanying background and I rather like the idea of newsprint and text fabric.  I am going to experiment with this idea, so hope you will come back next week and see how it is shaping up.   Oh and I think maybe a few luggage labels could be fun too... don't you?

See you soon, Ruby x 
Tessellation-ing!

How time flies when you're holed up in the sewing room on rainy yorkshire days.  Hot on the heels of ...and a little flushed with enthusiasm for.... finishing my last quilt - I am racing ahead towards another finish.  This time it is a special one.  This quilt is for my boy William, who started University in London last Autumn and yes, of course it was supposed to  be ready for that and yes, of course, as usual, I totally underestimated how long it would take to make - BUT (pause for a breath) this is a project that is just so perfect for a thoroughly modern, busy, sporty, techy, always connected - guy about town.  But before I show you some photos - a little recap.  When my first boy went off to Uni, a little way back, I was quite new to quilting.  I made him a 'New York' quilt with some fabrics that I had bought on a family trip to the US not long before and because he was totally enamoured with NYC (who isn't).  At this point, I didn't really know what a 'guy' quilt might be and used a pattern from my very first quilt book by Fons &  Porter.    I just wanted him to have something to take away to college, to brighten up those student nights when you need a little bit of home with you.   It turned out to be quite a success and just the right sort of thing.  Despite 3 years of university life, it is still in his room and very much Joe's quilt.

New York Quilt.JPG

When our daughter went away to college, I embarked on the epic - Gone with the Wind quilt, which lives with her at Warwick University and is much loved and snuggled under.  (There is a whole album on the sidebar about this 'production' called 'A Patch of Scarlett')

So now our youngest is off the launchpad, it was time for the last 'University' Quilt.  I thought that this boy, though, was the least interested in my quilting and fabric obsession and perhaps wasn't all that bothered - until I mentioned it.  The instructions were - something modern - grey and green and blue and absolutely NO flowers.   By now though - I was much more up to the moment with all things quilty and I knew exactly where to go for the pattern.

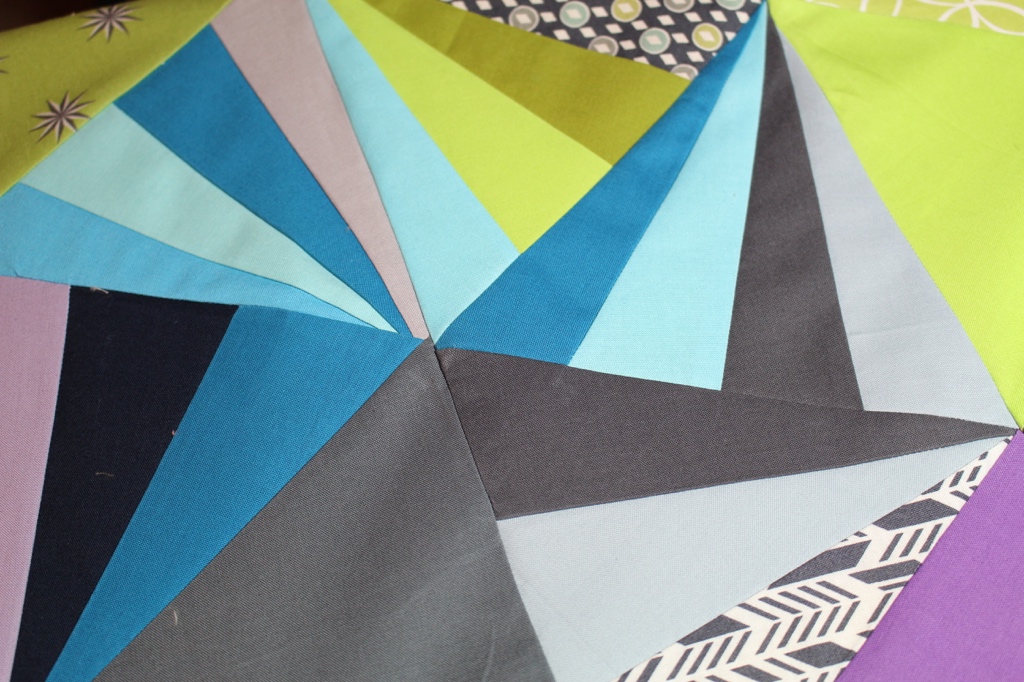
'Tessellation' by Alison Glass is just a wonderful quilt pattern.  I have seen alot of totally AMAZING versions of it on Instagram and it is just completely perfect for a modern student.   While of course, I struggled initially with the 'NO RED' idea (a few minor palpitations there), in fact the fabric choices came together rather easily.  I had thought to do all solid colours, with no prints at all, but as it happened, my daughter had brought back a couple of very modern bits of fabric from Citiquilter in NYC last summer and these text print fabrics just lifted the solid colours a tad.

The pieced blocks are done using foundation papers and this is a good project if you are new to that technique as you can put in as many or as few as you like.   There are loads of tutorials about how to do this online, so I won't explain here - except to say that I have tried alot of different types of paper for this and my absolute favourite is 'SIMPLE FOUNDATIONS" by C&T publishing.  These translucent vellum papers are strong and easy to use and are easily available from www.cottonpatch.co.uk.  Arranging the pieces is so much fun and using the stars as my starting point, made it easy to decide on the rest of the triangle.  

Tesellations3.jpg

In fact the rest of it is just a sort of higgledy-piggledy modern art mishmash, spacing your colours out so that it is fairly evenly distributed without looking like it was conscious placement.

Even though I have made quite a lot of quilts now, I always learn something new each time and this time, it was the importance of 'PRESSING'.  In a quilt like this with lots of triangles and biased edges that can stretch - spray starching and pressing is essential, absolutely all the way down the line.  Keep each row immaculately pressed with all the seams lying flat and it will help enormously to line the triangles up with the next row and to help the quilt to lie flat.

Tesellations4.jpg

I think it is perfectly fine to clip your seams too, if you find it sits better one way at one end and one way at the other end -after all we clip seams in dressmaking, so why not.  Use steam, lots and lots of it and just keep pressing everytime you join a piece in.  I am lucky enough to have a sewing table that gives me the chance to have a pressing board and iron alongside me when I sew and this is enormously helpful.  One other thing that was just SO useful when working on this project was a sturdy 15" rotating cutting mat makes trimming shapes super fast and efficient.   I first saw it about 6 months ago on the internet, when Kimberly at www.fatquartershop.com featured it as one of the best bits of quilting equipment around and I have to agree that it is a 'must have' in my sewing book.

So it is all together now and I think it is going to be a great quilt to actually quilt.  I plan to put a navy border around the edge - quite  a deep one, which will give me the opportunity to do some modern filler stitches in what now seems to be called 'negative space'.  I also have alot of scraps left and I don't like to waste fabric, so I might try and put together a scrappy binding for the quilt.  I'll let you know how I get on with that soon.   Meanwhile, for today at least....I shall just sit back and enjoy looking at it.    I hope he likes it...... think he will........

IMG_1992.JPG
Cross stitch quilt label.JPG

Oh.... and what's more.....a new blank design space is now staring at me from my wall.....mmmm  have to do something about that I think..... maybe it is time to try little designing of my own........

Such a tidy sewing space ! Don't suppose it will stay like that for long LOL!  Love Ruby x

Oh my goodness....IT'S FINISHED!!!!!!

Happy Friday fellow stitchers!  Over here in Ruby's sewing room it is not just the end of the week, but the end of a long... long project.  My Winter Solstice quilt is finally finished and I love it so much, I am quite overwhelmed.....

IMG_1006.JPG

I began this quilt way back last year in readiness for our new home.  It is a pattern called 'Fresh' from Camille Roskelley's book 'Simply Retro' which is one of my all time favourite books.  The piecing was done before we moved back to England, but I delayed quilting, what is actually a King Sized Quilt, until I got my new Janome Horizon sewing machine with the bigger arm space.  I can honestly say that this made a huge, huge difference.  I was able to quilt quite an intricate pattern with ease on the machine and although it was a big undertaking - I am just delighted with the results and I do have some tips for quilting such a large project.

* This was the first quilt that I began the quilting at one edge and worked across in rows, rather than starting in the centre and working out.   It was so difficult to get the backing flat on such a huge quilt, that I think this system worked well, as I was able to smooth it out as I went along.

 * I actually had my iron alongside me and pressed each segment before stitching, as I went along each row of stars.  This ensured that everything was smooth, a little at a time.

*Changing the tension on my sewing machine made a difference to the stitching - I actually had it set quite high, because with free motion quilting, I think this helps the underneath stitching to be more even.

* Draw your shapes on with an erasable pencil, if you don't feel comfortable free handing it.  I got quite into the feathers at the end, but in the beginning, I drew the shape on to help guide my stitching line.

*and finally - BE BRAVE and GO FOR IT!

IMG_1003

Oh and don't forget to label your quilt.   It is SO important to do this.  I always give my quilts names, not necessarily after the pattern I used or the fabric line I used, but something that suits the mood of the quilt I am making.  I called this one 'Winter Solstice' because the fabrics have a snowy theme (the Winter's Lane fabric line) and because it reminded me of our time in Stockholm, where the Solstice is an important point on the calendar, because it is signifies 'a tipping point' in the long long winter months.  This quilt is somewhat of a 'tipping point for me in my sewing adventures too - a little less amateurish and a quilt to give me confidence to try something even harder next time.  But most of all, I label my quilts for posterity.  In the few years since I have been quilting, I have seen how our quilts melt into our family life, symbols of home and comfort and wrapping something around you that speaks the words 'safe n warm'.  I hope they go on to mean this to future generations of my family and that just a little of me goes with them.

There are many ways to label your quilt and I have tried a few, but generally, I like to make my quilt labels out of simple cross stitch fabric and thread.  This give you the freedom to write what you want and make it as big or small as you like.  You can choose matching threads to coordinate with your quilt and there is something 'old school' about  it - very appropriate for an 'Old School house'.

Photo 2

Once it is stitched, simply iron the sides under and attach it to your quilt and I think it's perfect and no worries that ink will wash away with years of laundering.  It should stay as a permanent record of your work.

Photo 1

There is just one final problem though - it's way too big for our old bed - LOL!  time to get a new one, I think....... Happy weekend, Ruby x

P.S.  Just in case you are a bit confused by the 'initials' - well, yes, I have to confess that my real name is not Ruby Seppings - but one day soon, I will tell you all about who she is, and you will understand.

Snowy Days and a Winter Solstice Quilt

Our first January in our new home has brought us some lovely snowy days up here in the Yorkshire hills.  I suppose after overseas postings in Russia and Sweden, you could say that we are used to it and we are, but in fact in both cases, we were living in cities, in countries that are geared up for dealing with it - Yorkshire...not so much....LOL!   Actually, that is a bit unfair... the gritting lorries have been out and about, it is just that we live on a hill and with no winter tyres on the car... time to stay home and sew.   I do love those early morning moments though, when I glance out of the kitchen window and see this.....

IMG_2180.JPG

 and even in this cold... signs of life in our garden

 Anyway, was in my sewing room, working on my embroidered cushion, when I spied our mischievous cat, Basil skulking into the basket under my sewing machine table and lounging around on my unfinished 'Winter Solstice' quilt.   When I chased him out, I saw it was completely covered in cat fur and he has obviously been sneaking in there without me knowing.   Time to get it out and finish it, I think.

rubyseppings - ieoZyOCU_8.jpg

I started this quilt last year in Stockholm while we were waiting for the house purchase to go through.  I was totally enamoured with this fabric collection 'Winter's Lane' and knew it was perfect to go in our bedroom.  It also had elements in the design that would remind me of Sweden... and in fact the cherry blossom fabric, reminded me of Japan where we took an amazing holiday in 2012.   I blogged about this when I was piecing it, but just to  recap - the pattern I chose is from one of my all time favourite quilting books 'Simply Retro' by Camille Roskelley, who is probably one of the most popular modern designers out there at the moment.

It is a very large quilt - king size, I suppose and once layered with the backing and batting it is heavy and bulky to manoeuvre.  Of course, I wanted it to look like the one in the book, which has probably been done on a long arm machine by a professional quilter - mmmmmm!  I do like a challenge though - ok so let's go for it!

I chose a free hand feather design for the patterned pieces and a curvy diamond with stippling to fill in the blank squares.  I simply used a plate to outline the shape in pencil and stitched it with the free motion quilting foot on my machine.

rubyseppings - sh-OH2iU_N.jpg

 I have to say that having the extra long arm space on my new Janome sewing  machine made a huge difference to this.  It is still a bit rough on the neck and shoulders, but I am pretty pleased with how it's going so far.  

It's not quite finished and I shall be post some photos when it's done and 'in situ'.  Got to dash now though as we are off to Houston, Texas for a week or so.   Super excited and especially as I will get to meet up with my dear friend and quilting teacher from way back in Paris... and I know she has a very special quilt to show me.... so watch out for that next time.... oh .. and the Alamo...... better go and pack....

See you soon, Ruby x

rubyseppings - yUuHqfCU1Y.jpg

Stitching Christmas Wishes

Christmas this year is going to be really special.  It is the first christmas in our new home and in England for some time and all our three wanderers will be back with us.  It will be the first time since last christmas in Sweden that we have all been together.   It is true 'there is no place like home' and I love the familiarity of all the christmas traditions I hold so dear and the ease with which I can put this all together this year.   All those delicious ingredients to make Christmas Mincemeat and Puddings are already heaped on the supermarket shelves along with crackers and all the other things that are needed to make this an 'english' annual ritual.   That is not to say that we will forget all the lovely things we have picked up along the way in our many years of travel.  Incorporated into the festivites will be a French Christmas Eve Feast, a Russian New Year Celebration and a Swedish Smorgasbord.  We have deocrations from all our travels, and a few small traditions that we have incorporated into our family celebrations.  I'll be writing more about all of this as December goes along.

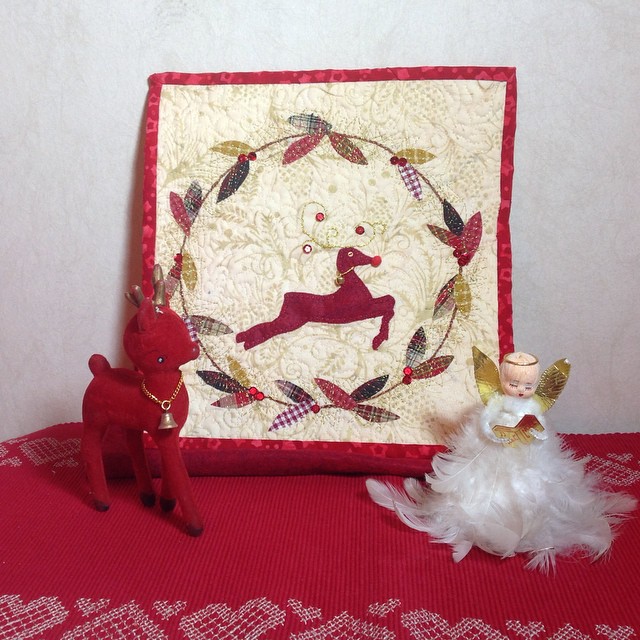
For now though, it is time to get busy in the sewing room to make a few small gifts and decorations, which I try to do every year.   This year I wanted to make some small applique pictures - almost like fabric chrismas cards that I could send easily to friends and family in the post.  I chose one of my favourite winter motifs - the reindeer as the central idea.  In Stockholm, our garden was a winter wonderland by this time of year and the local deer would wander about, in and out of the trees and the snow and fill the air with the spirit of christmas. I shall miss that this year, but in truth what prompted it all was a little red velveteen reindeer, found in an old ice cream carton amongst all the stuff we got out of storage with the move home.   I haven't seen him in many many years, but he belongs firmly in the christmases of my childhood.   As a tiny girl, I would play with him underneath the christmas tree and I remember being most upset that he had to go back in his box when christmas was over.  

So I gathered together all my christmas fabrics and trimmings and felt and velvet and started messing about.

 I searched on google images for a silhouette shape that would work with applique - there were plenty to chose from and I printed it off and adjusted the size on the photo copier to make it alittle larger.  Trace the outline onto fusible web, remembering that it will be in reverse.  I actually traced my reindeer both ways so I could have him facing either way.

 For my background fabric I chose christmas batik prints - I especially like this one as the reindeer looks quite at home prancing amongst the trees.  I used a tea plate to draw a circle with a white chalk pencil and then I embroidered the outline with a perle cotton 8 tweedy thread and a chain or tambour stitch.

 Next iron on your reindeer using the fusible web to fix it.  I used both felt and velvet and both worked easily. Felt is probably slightly easier to work with because it doesn't fray around the edges like cotton velvet.  Anyhow, once your little guy is in place (make sure you leave space for the embroidered antlers), you need to secure him with a blanket stitch on the machine or by hand.

 Next draw on your antlers and set to work to embroider them  however you like.  I chose to use some gold and silver thread that was couched using a fine metallic thread.  Couching simply means that you lay the thicker thread on the outline you want and stitch it down with tiny overstitches.

To add a little extra sparkle, I put a few sequins on the ends of the curling horns, a tiny bell around his neck and a fluffy red nose.  I felt he needed to be able to see his beautiful surroundings, so I used one of those tiny micro buttons for an eye.  I think he is looking pretty neat now.

rubyseppings - vjNt4hCU4K.jpg

For the wreath around the edge, I used up lots of scraps of tartan and plaid flannel fabrics, backed with fusible web and simply cut out in tiny leaf shapes.  Scattering them around the ring looked rather pretty.

rubyseppings - v1q_s_iUxg.jpg

 I ironed them on and then decided that there was no way I was going to stitch around each one to secure it, so I had another idea.  I layered it with the batting and backing.

Then I put the fine metallic thread in my sewing machine.  I am not a great fan of sewing with this - it is a bit faffy and the thread can break frequently.  It is absolutely essential to have the right needle in  your machine.  I stitched a twiggy zig-zaggy higgledy-piggledy wreath all over the leaves and actually it worked really well.

rubyseppings - vjc3OCiU-g.jpg

Finally add some berries - either more sequins or buttons or you can add some tiny felt ones and glue them on before stitching the wreath as I did on the first one I made.

 Bind it up and VOILA - I think it's a charming christmas card and one that will last more many more christmases to come!

Off now to make some Cranberry, Clementine and Pecan Mincemeat.  See you soon,  Ruby x

rubyseppings - v_lwLciU9l.jpg

But where was Mr. Darcy??????

England has been basking in unseasonably warm weather.  It is absolutely glorious up here in the Yorkshire Hills and easy to find inspiration for alsorts of projects.  However, a little exploration both on the internet and the winding country roads, enabled us to find a hidden 'gem' of house that was just bursting with history and treasures and ideas for embroidery.

Nostell Priory is a magnificent Georgian House, nestled in the Yorkshire countryside.  Built between 1733 and 1785, it is just the sort of place that you imagine Jane Austen's heros and heroines would be quite at home in.  Infact it is constructed on the site of a 12th century monastery that was destroyed in our 'ever notorious' King Henry V111's rampage and reformation.  In 1654, a wealthy family of textile merchants by the name of Winn, bought the land and existing dwelling and ruins with 'big big ideas' for a new country house.  After the upset of the english civil war, the savy Winn's backed the winning side and the King and in return, were rewarded with a 'baronetcy' to sit nicely with their growing fortune and estate.  The architect James Paine would work on the house for 30 years to create a Rococco feast!! 

In 1765, the title passed to a new generation in the Winn family and as it always goes, the new baronet - now established in the world of aristocracy and fantastic wealth, married a beautiful Swiss lady who came along with her own grand fortune and even grander ideas.  This fashionable couple insisted on nothing but the best and employed the great interior designers of the day - Robert Adam and Thomas Chippendale to make sure that their home had one of the greatest collections of fine furniture and georgian style in the country.  Many of these original bespoke items are still in the house today and it is completely 'splendid'.

The ceilings had a 'wow' factor for sure and I loved this mixture of colour and shapes.

Fireplaces too, had beautiful details on them - oooooh, I think this one especially is cool for use in applique, don't you think?

The library was perhaps our favourite room...

There's an idea in there for sure and there were amazing textiles everywhere....

The gardens too, were magnificent and on such a glorious day it was bathed in autumn sunshine and perfect for some photographic shots.

Not sure about that bridge though!! especially in long petticoats!!!!  

The back yard!!!

And finally my favourite shot of the day - the bulrushes ......

Bullrushes.JPG

So where is my notebook?.......ah there it is and a little doodle design inspired by my day.

I know exactly what I am going to do with that, but you will have to pop back in a while to see.  Oh and incase you are interested - working with circles is so much fun with a few helpful tools - Circular template rulers by Lori Holt of 'Bee in my Bonnet' and a whole ring of mega useful plastic discs called 'Bigger Perfect Circles' by Karen Kay Buckley, all of which are available at www.fatquartershop.com.  

Bye the way, Nostell Priory is owned and run by the National Trust today and you can find more info about it on their website if you should get a chance to visit.   I have to say that after years of living abroad, the National Trust is really a National Treasure - I am not sure there are many other countries in the world that do this sort of thing as well as they do.  I probably never told you about the times I visited 'Arckangelskoye' in Russia - the once grand country house of Felix Yussopov.... and wished the National Trust was there to rescue it.  But that's a whole other story...maybe next time.  Meanwhile, it was a totally glorious day at Nostell, but really...... the main question of the day was......where or where was Mr. Darcy? LOL!  Ruby x